Maisie Violet
Cart 0


Ikea Hack

IKEA IVAR HACK JONATHAN ADLER STYLE

If there was a designers work who I have always dreamt about having in my home, it’s Jonathan Adler! I was luckily enough to get my hands on some of his gorgeous homeware from his collab with H&M home last year but it only left me wanting more!

His signature monochrome style has played a big part in the decor around my own home as I began  adding black accents to the blank white canvas of my one bedroom flat. Similarly to Jonathan, I love the contrast of pops of colour against a monochrome backdrop, you may have a noticed a few ‘subtle’ 😂 flashes of neon appear around my home! I also love the gold embellishment used by Jonathan on his furnishings, paired with striking monochrome geo patterns, so, I decided if I can’t quite afford one of his larger pieces of homeware, I’ll try and create my own instead!

ACS_0940 2.JPG

Queue the Ikea Ivar Cabinet! The Ivar is an Ikea classic that’s popular amongst keen interior lovers looking to upcycle and give it a personality if it’s own. At a mere £45 for a large solid wood unit and a trip to my local in the pipeline already planned, I had to pick one up and give it a go (it was also super simple to put together).

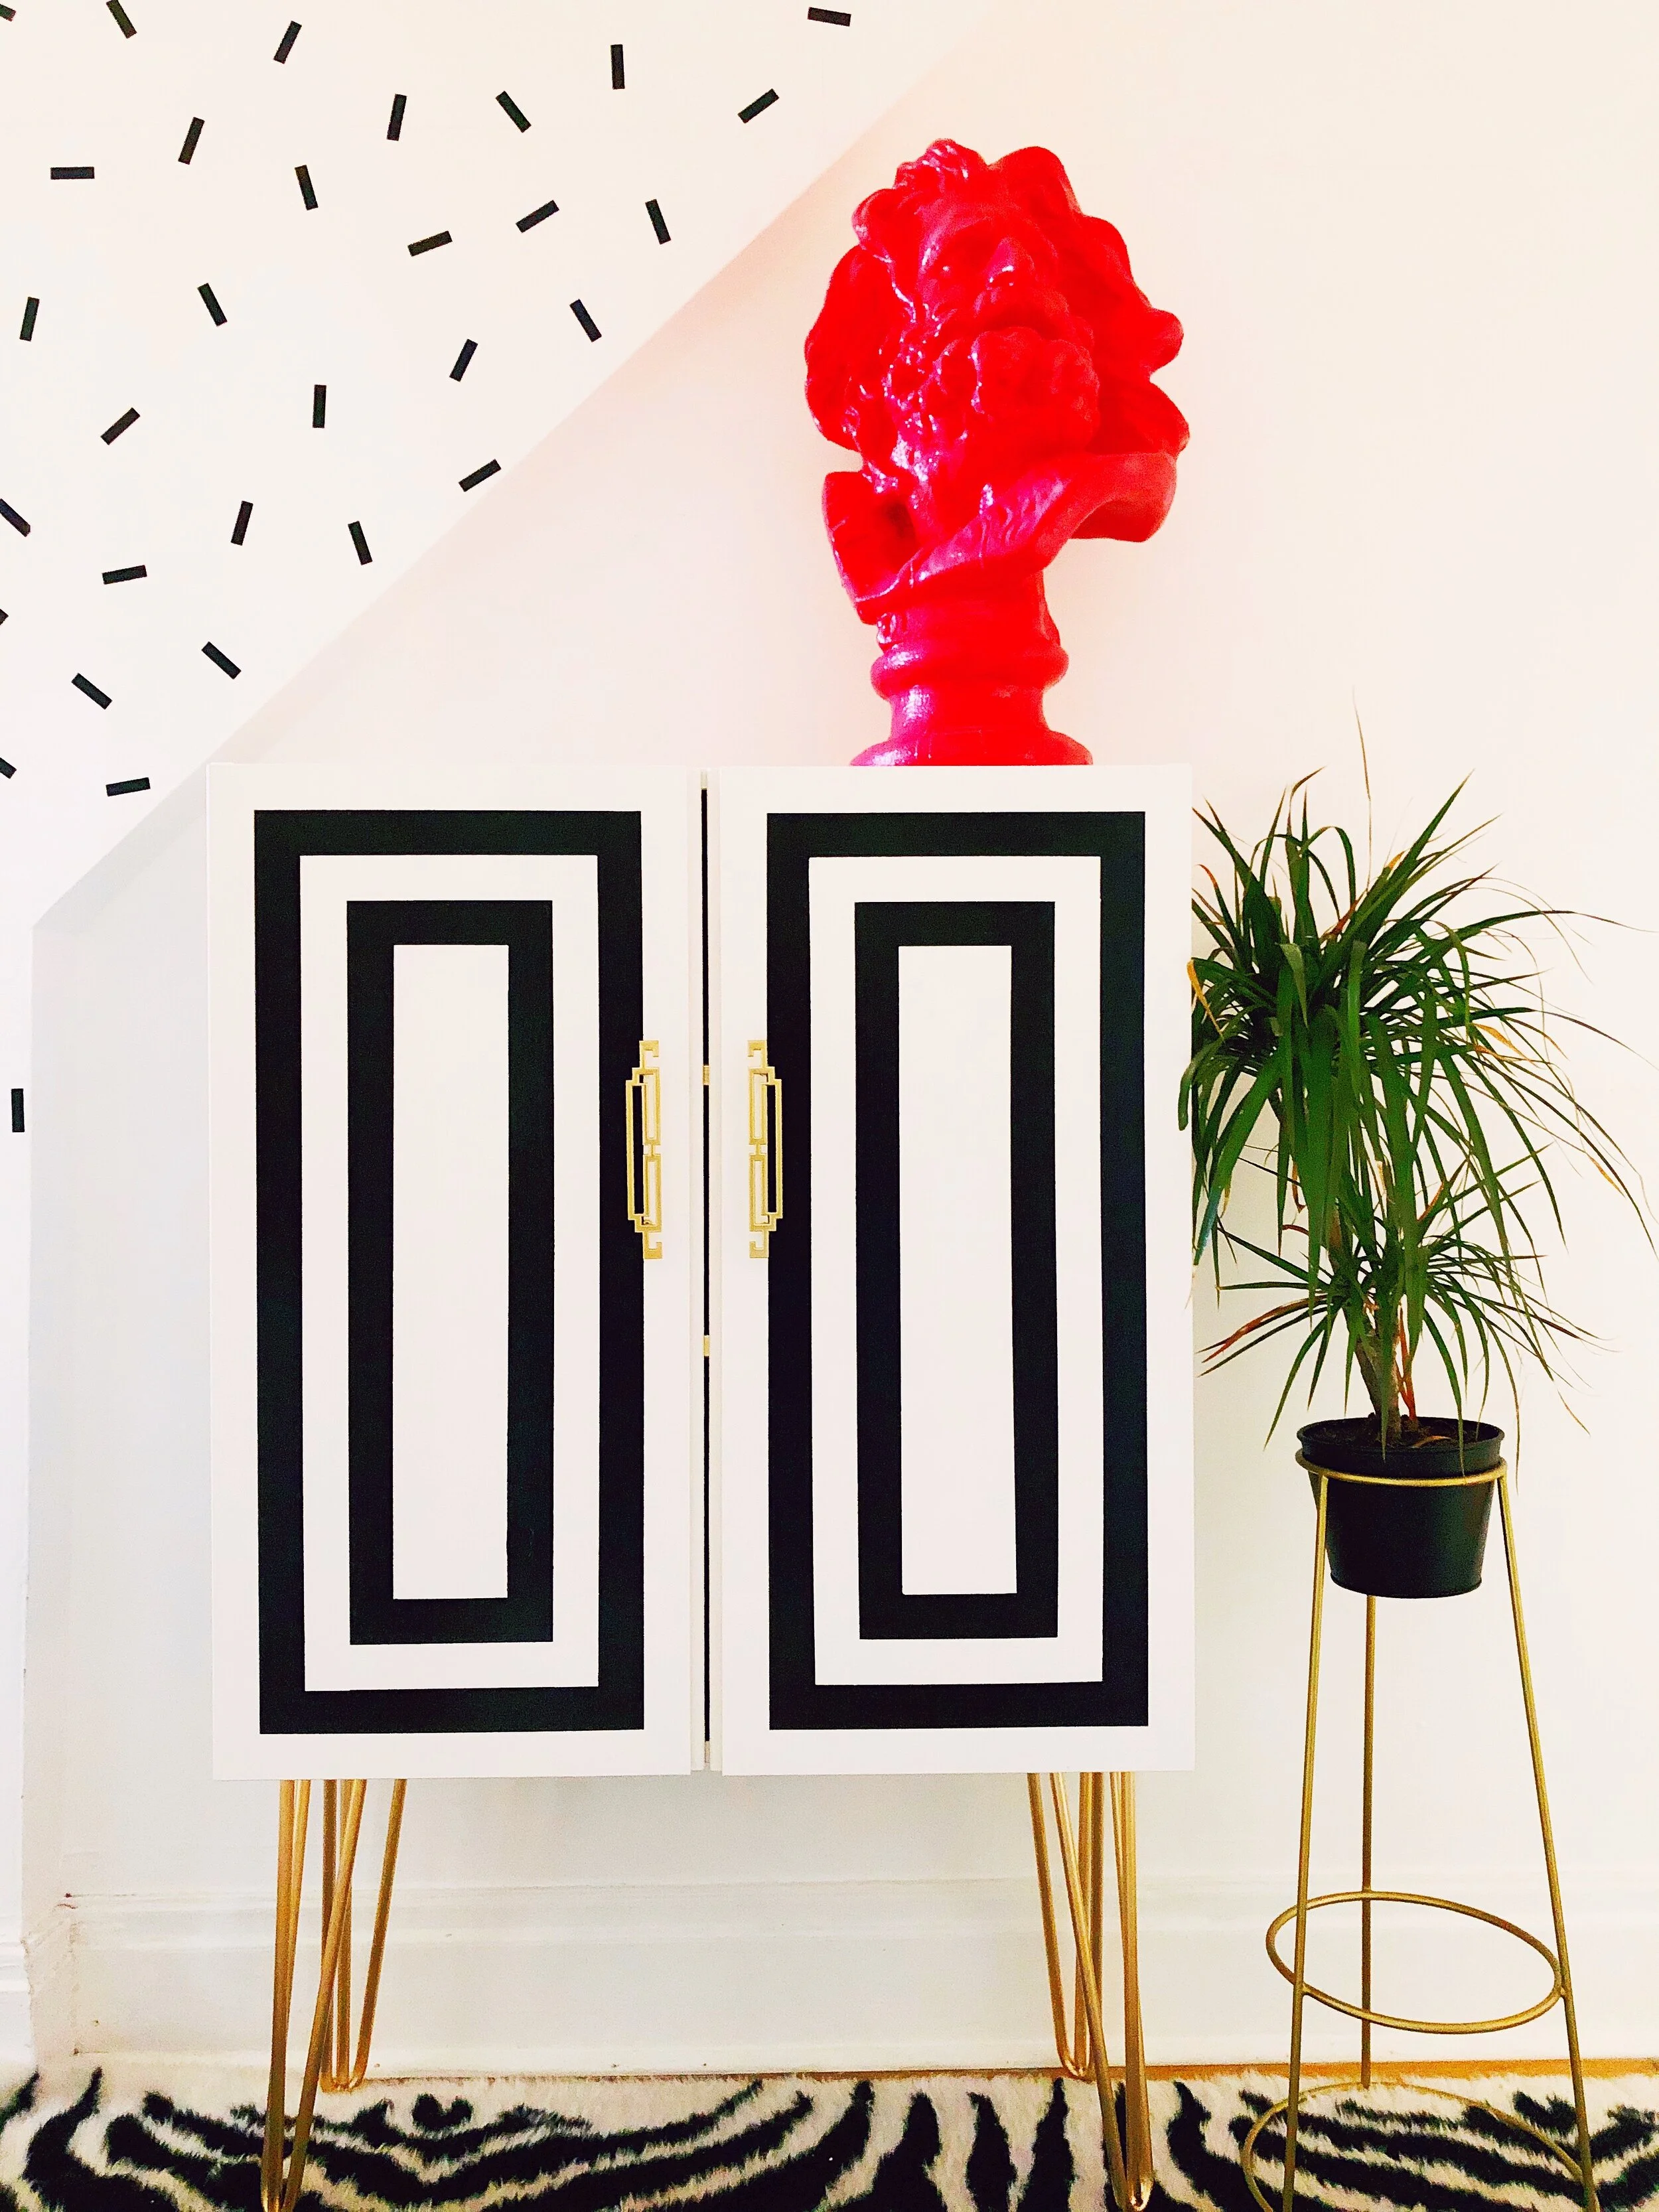
In this tutorial I’ll be talking you through how I transformed this basic wood unit into a maximalist cabinet of dreams!

What you’ll need:

Gold spray paint 

M5 Screw and bolts 

Gold decorative handles 

Wallpaper for inside the cabinet 

Gold leaf 

Gold leaf adhesive 

Screw driver 

Drill & drill bits 

Ikea Ivar cabinet 

White satin finish paint (I used Wilkos wood paint)

Black satin finish paint (I used rustoleum)  

Frog tape 

Craft knife

Hair pin legs x 4

White primer spray paint 


Step 01

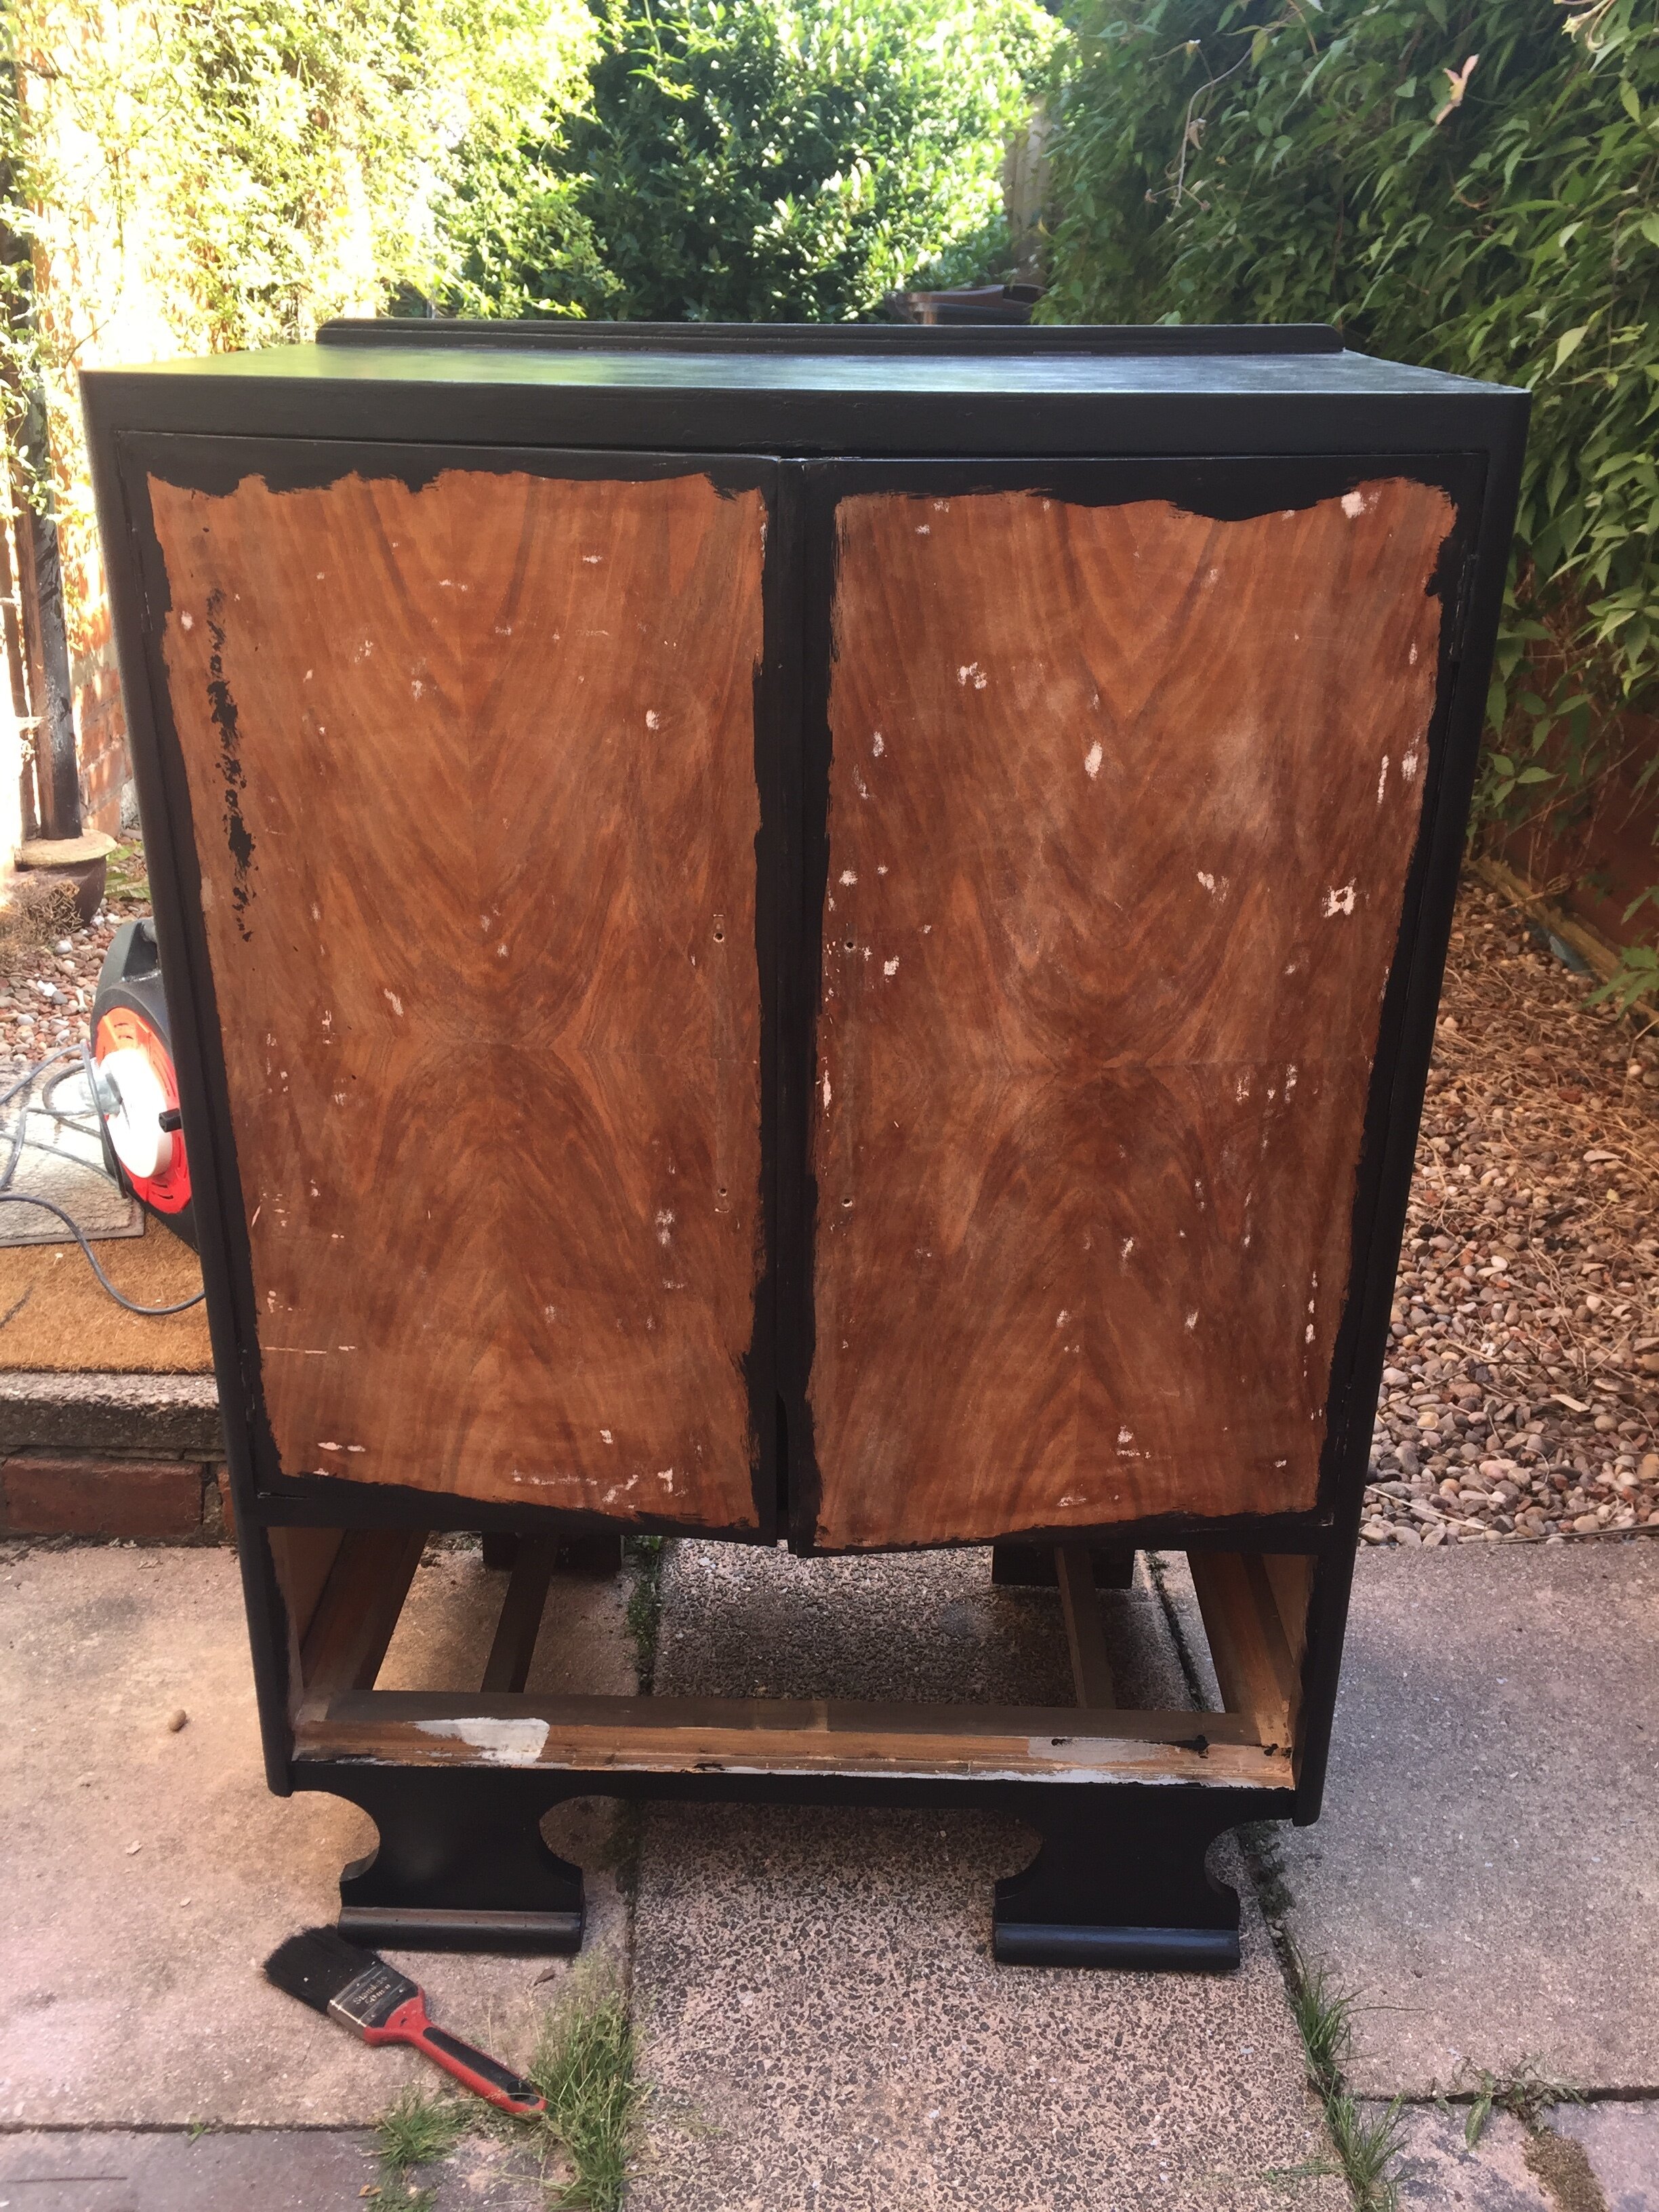
Begin by assembling the Ivar unit, it was surprisingly easy to put together, however I wasn’t prepared for the notorious ‘Ivar Gap’ which I wasn’t aware was a thing until I took to instagram to see if anyone else had the same issue. After trying to adjust the fixing to attempt to close the gap, I spent a few days deciding wether I could live with it or not, turns out I can! But if you can’t, there are a few hacks online and even a kit you can buy that apparently closes the gap.

Once it was assembled I painted the entire unit (apart from the inside) white with Wilkos Satin Finish wood paint. Take note, the Ivar is untreated pine so is really absorbent, so is you’re painting it a bright colour, I’d suggest priming it first, so you don’t have to use lots and lots of paint.


Step 02

Once you’re happy with the colour of the outside and it is fully dry (this will be dependant on the paint) you can start working out how you want your pattern. Now I’m pretty lazy, and instead of using a ruler to measure out the distance and position of each pattern, I use frog tape as a guide. I use the tape as a way to measure and determine the distance between each pattern by using the tapes straight edges and thickness. For this hack I created an alternate border on the 2 doors and also on the sides, the areas I left covered in masking tape would remain white, and all the other areas would be black.

IMG_8057.jpg
IMG_8087.jpg
 

Step 03

Once I’d applied the masking tape I went over all the edges of the tape with my finger, pressing down firmly to ensure there wasn’t any chance of any paint bleeding through. I’d always recommend frog tape for a job like this as big standard masking tape always let’s paint through. I began painting over the white surface with a black satin finished wood paint. Once the first cost has dried I then apply a second coat, and once applied I remove the tape immediately, that way the tape will come off smooth and clean, and won’t pull any dry paint off with it. Touch up any black paint that may have bled through with a fine brush and the white paint you used for the base.

IMG_8058 2.jpg
IMG_8063.jpg
 

Step 04

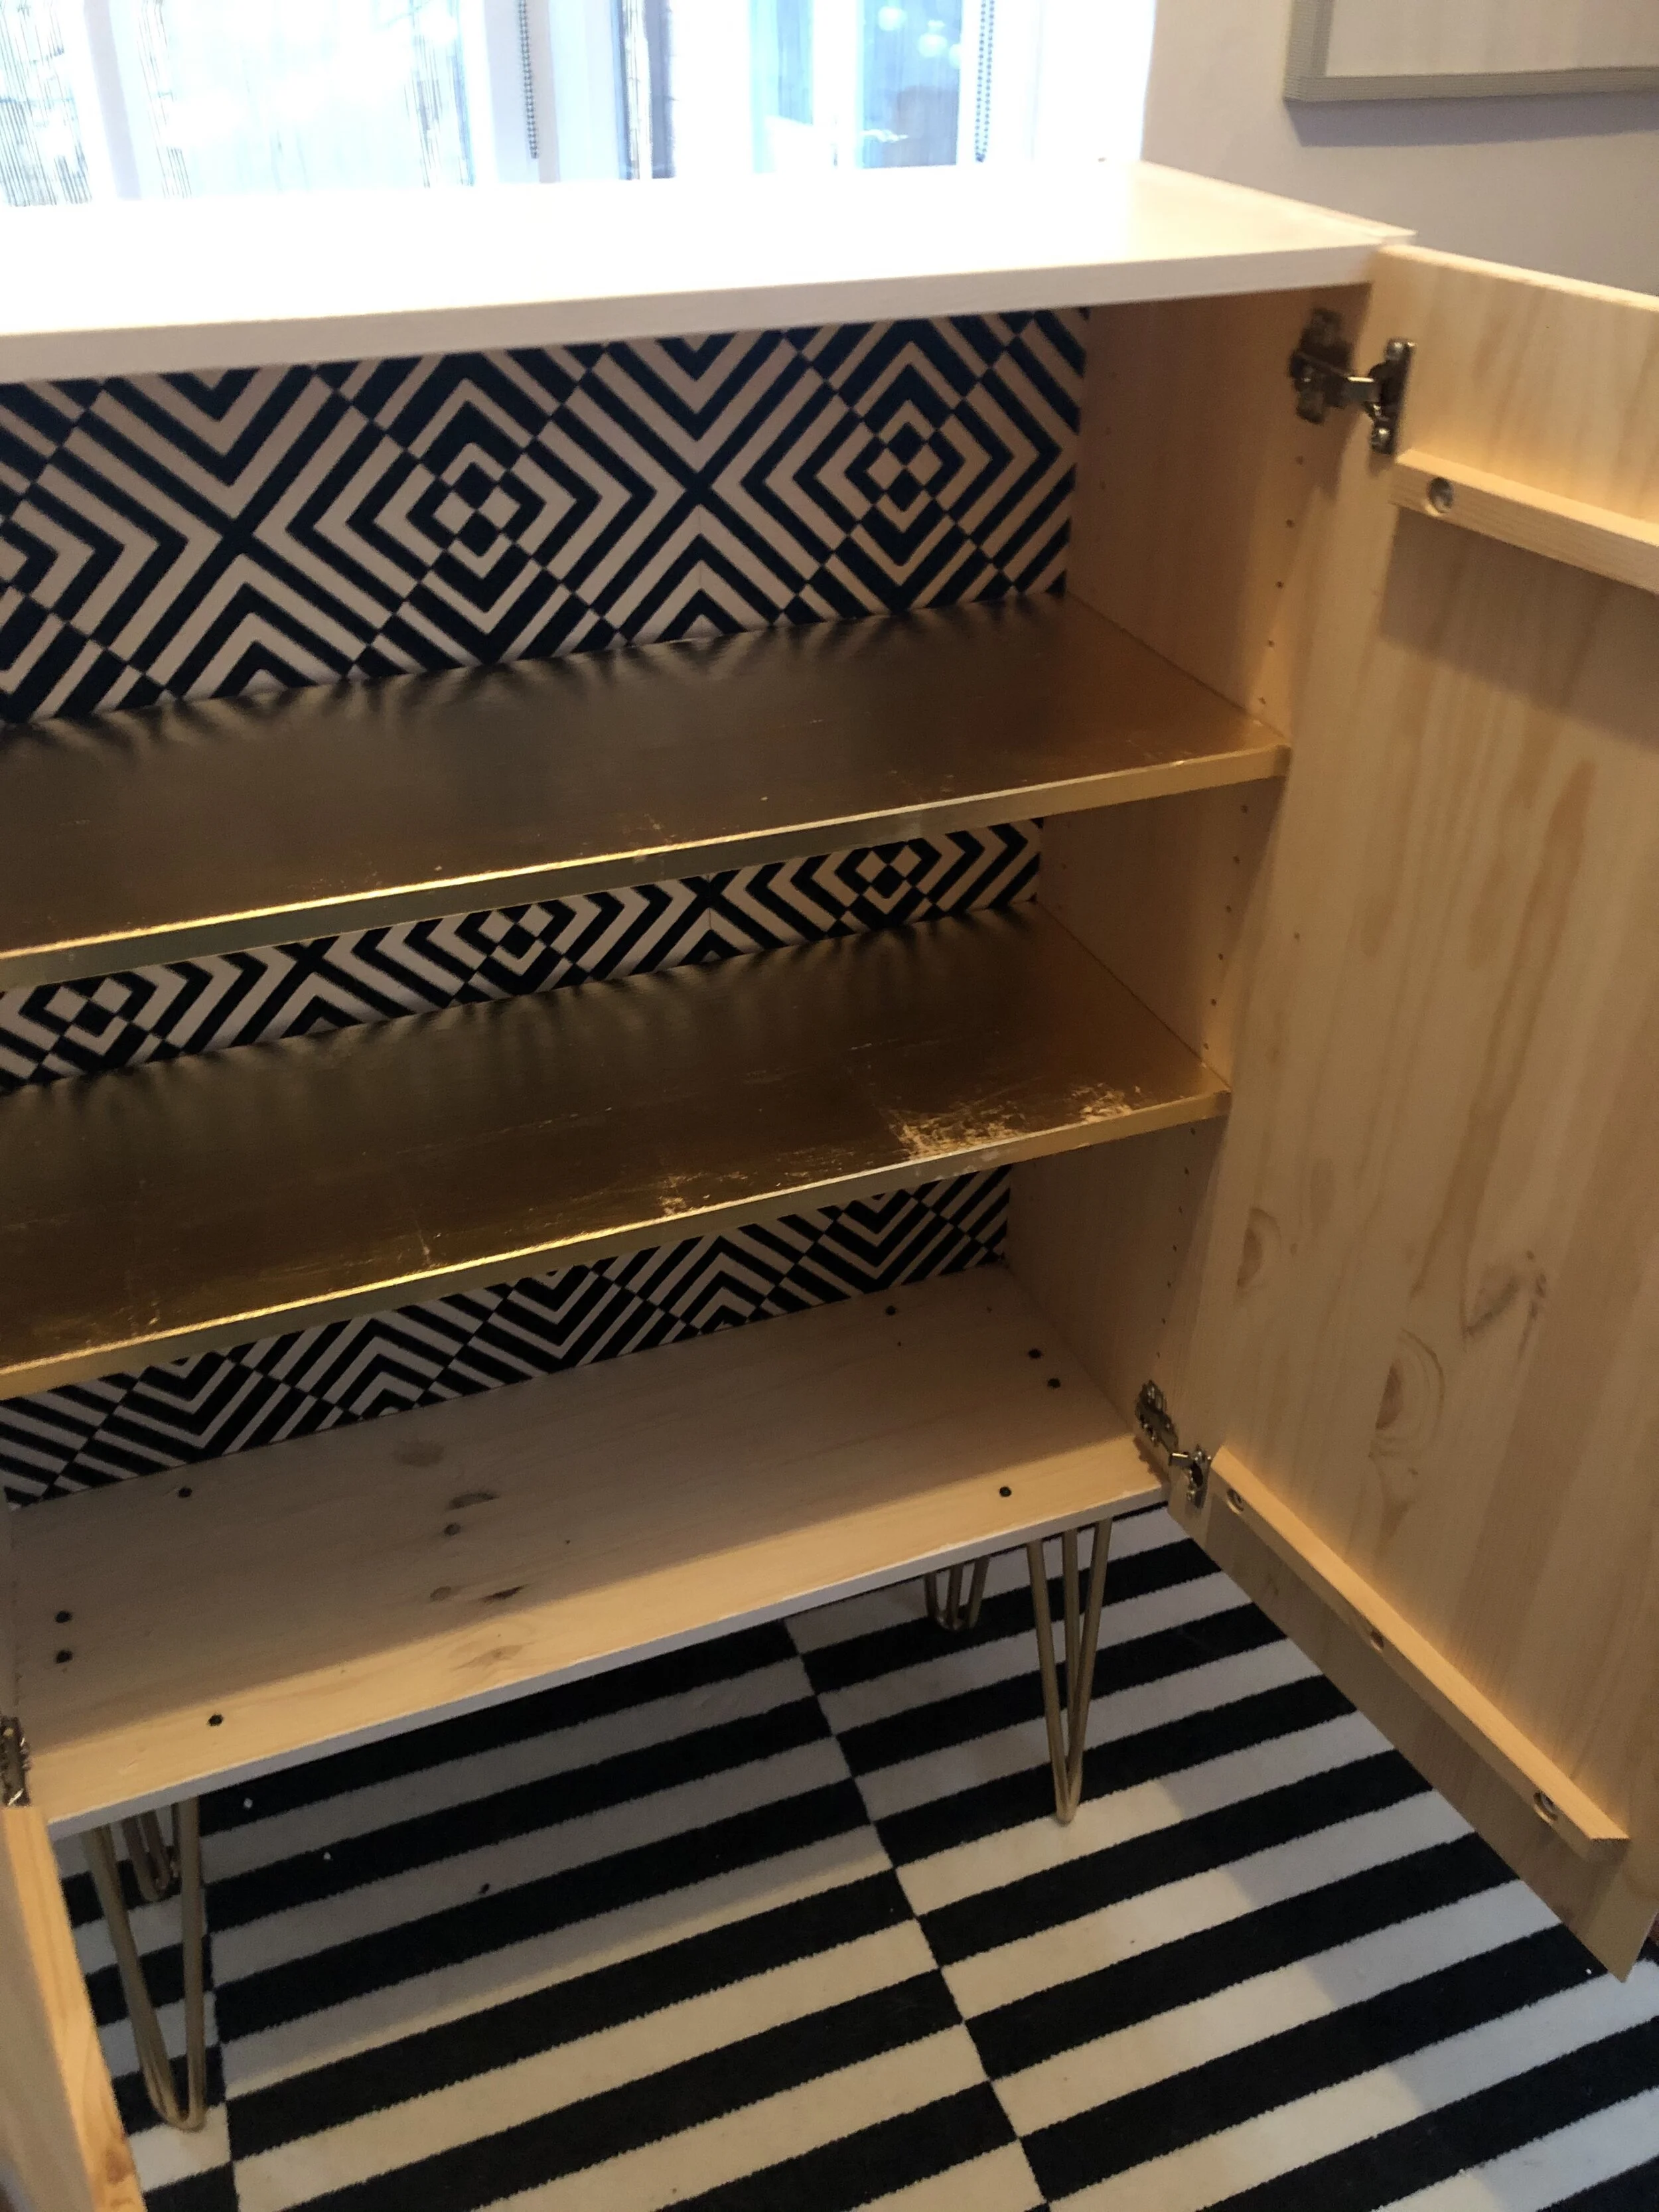
Now your outside is done, it’s time to work on the middle, I began with gold leafing the shelves. I applied a layer of polyvine metallic leaf glue onto the top and front edge of the shelf, as that’s the only edge you’ll see, and left to dry for a few hours until the surface feels tacky as thats when the leaf adheres the best.


Step 05

While the glue for the gold leaf was drying I began painting the inside of the cabinet black. As the back would be covered in wallpaper, you don’t have to be too neat when it comes to going over the lines, as it’ll be covered later.


Step 06

While the paint on the inside of the cabinet dries, the glue on your shelving should have dried but is still tacky, you can then start applying your gold leaf. Once all the shelf is covered, using a dry paint brush, began brushing off any excess pieces of gold leaf until you have a smooth finish. (Optional: seal your gold leaf in with a coat of Polyvine clear lacquer). Don’t insert the draws until the very end of tutorial.


Step 07

Before you install your shelves back in the unit, you’ll need to cover the back with a wallpaper of your choice. As the cabinet is quite wide, you’ll more than likely have to align two  pieces of wallpaper together, so I’d advise measuring out you pieces in advance, to make sure they fit and that you’re happy with pattern. To stick your wallpaper onto the back piece, a stands PVA glue will do the job. With a large paint brush paste generous amounts of glue onto the back panel, use a smaller brush for the edges to avoid getting the glue on any paint work (although it’s not biggy if you do, because it will dry clear anyway!).  When the back panel is covered in PVA, begin to apply your pieces of wallpaper and trim off any excess with a craft knife.

IMG_8534.jpg


Step 08

Once all your papering and painting is finished, I’d advice applying a top coat of varnish to the outside, to protect from any chips or scuffs in the future and to give it a professional look. You can also apply a top coat to the paint work on the inside of you wish


Step 09

Now it’s time to add to the legs and handles! This is my favourite part, it’s like the icing on your deliciously upcycled cake! I tend to keep any hands I might remove from old projects and re use them on new projects, I like to bring them back to life by spray painting them too! Or, if I’m feeling fancy, I’ll buy some new handles, you’d be suprised how cheap they are, I always look on eBay and Amazon. The hair pin legs I bought were chrome, so I sprayed them with a white primer and then gave them a couple of coats of gold spray paint to match the gold geometric handles I had purchased from amazon. 

IMG_8258.jpg
IMG_8268.jpg
 

Step 10

Starting with the legs, carefully turn your Ivar on it’s head and position your hairpin legs where you’d like them to be attached. Using a sharp pencil (it must be a sharp pencil so you can draw around the entire circle), draw around the circles of the screw holes for each leg so you know where to drill. Alternatively, you can get someone to hold your hair pin leg in place, while you lightly make a mark with the drill to show you where you need to drill the hole. Using a drill bit the same size, or slightly smaller than the hole in your hair pin legs, begin to drill in to where you have marked up with a pencil. Once your holes are drilled you can attach your legs, I used M5 size, however this varies depending on what size legs you use. Begin my tightening each screw loosely with your hands, and when all screws are in all four legs, tighten with an adjustable spanner.


Step 11

When attaching your handles, remember to use a ruler to accurately mark out where each handle will be so they are straight and align perfectly. Use a drill bit the same size as your handles screw, once attached, tighten with a screw driver.

ACS_0984.jpg
 

STEP 12

Flip your Ivar back the right way round and you’ll want to give the inside a good clean and get rid of all the wood that’s gathered in their as a result of the drilling.Slot in your shelves in, keeping in mind what you’ll be putting in there, so everything will fit neatly.

AND YOU’RE DONE!

 
ACS_0990.jpg


Quarantine Creations

DIY UPCYCLED SUITCASE COCKTAIL BAR

This has to be my most impressive lockdown creation, even if I do say so myself! This vintage suitcase was given to me by my dad, it belonged to my stepmoms mother, and he thought if I couldn’t think of anything to do with it, I could always just sell it on eBay.

ACS_0804.jpg

The case was sat gathering dust for a month or two because quite honestly it was so discoloured and a lil bit mingin’ that I didn’t think there would be any upcycle that would bring it back from sorrybstate it currently was.

Shamefully it took me until I was just about to write it off completely and sling it in the pile of stuff to go to the charity shop, that I actually opened it up, and to my suprise the inside was in pretty sweet condition and lined with a gorgeous baby pink silk fabric, it was then that I knew I had to show this beauty off and give it the glow up deserves!

As impressive as this DIY suitcase bar looks it was actually dead easy to do. In this tutorial I’ll talk you through step by step how you too can Upcycle a shabby old suitcase into a chic cocktail bar.

Choosing your case

  • Id advise using a small carry on suitcase for this upcycle. Any suitcase can work as long as its not too big, if you’re going to have your case open most of the time, it’ll take up a fair bit of room if its a large suitcase.

  • If you want your bar to particularly impressive, use a vintage suitcase, these can easily be found in charity shops or on eBay from about £5.

  • Pick a case that has little damage on the outside, the inside can always be re lined with fabric if needs be.

IMG_4827.jpg

Painting your case

  • Decide on your colour for the outside of the case, if you’re going brighter than it already is, I’d suggest using a white primer so the paint adheres better and makes your colour of choice really pop. You can pick up a primer from most hardware stores, I used Wilkos white matte all purpose primer for this project.

  • Removing the hardware is a little tricky so if you want to keep the fixing as they are, as they might still be in good condition, use masking tape to cover any bits you don’t want spraying in your primer, you can then peel off the masking tape after you’ve finished painting the case.

  • Alternatively, if your fixings are looking pretty worn you can skip the masking part and spray with the primer, then use a fine paint brush to neatly paint the small bit of hardware in a metallic finish once you’ve completed painting the case in your colour of choice. I used a Rustoleum gold furniture paint to go over my locks and hardware. 

  • As I wanted to spray my case white, I used a Rustoleum White matt painters touch spray paint to get an even finish on the outside of the case, but you can use tinned paint if you prefer. Once I had finished waiting the body of the case and hardware, I went over it all with Ronseal interior varnish to seal everything in.

IMG_5219.jpg

Adding an accessories bar

  • If you want to add an additional bar for hanging your cocktail accessories then you’ll need to carefully remove the lining on the inside of the suitcase lid. I purchased my bar from ebay where you can choose from a number of different and styles and finished for a couple of quid.

  • On the outside of the suitcase mark out with a pencil where you’ll be drilling the holes to attach the bar.

  • Use a drill bit that’s the same width as the bars screws, and drill two holes where you previously marked and make sure they are level. To do this either use a spirit level or measure with a ruler. Once you have drilled the holes, using a glue gun or strong double sided tape, fix the lining back onto the suit case.

  • Insert your screws and when you can feel them through the under neath of the lining, use a craft knife to puncture a small hole in the fabric and pull the 2 screws through, attach your bar, tighten with a screw driver so your bar is firmly fixed into the case. 

image+3.jpg
The screw heads from where the accessories bar is attached will be visible when the case is shut, however these can be easily disguised by painting over them in the same colour as your cases exterior.

The screw heads from where the accessories bar is attached will be visible when the case is shut, however these can be easily disguised by painting over them in the same colour as your cases exterior.

ATTACHING HAIRPIN LEGS

  • To attach the hair pin legs, you’ll be using a similar method as just mentioned. Carefully remove the lining on the bottom of the case, either by unpicking or slicing with a craft knife.

  • Then, close your case and place on the ground, with the bottom of the case facing up, place your hairpin legs on top of the case where you want them to be fixed and mark out with a sharpie where you will be drilling the holes your screws will go.

  • Using a drill bit that’s the right size, drill your holes, once all your holes are drilled, hoover the case out to remove any excess bits of case as a result of the drilling.

  • To attach the legs to the case, I used screws and bolts. Try and use a short screw, that’s big enough to hold everything in place, but small enough to not poke out too much inside the case.

  • Once all screws are bolted and tightened, turn your case over and re attach your lining by either glue gunning or double sided tape, but only do this once you’re happy with the tightness and positioning of the legs.

IMG_5325.jpg

You’re almost finished!

All that’s left to do now is to fill it with your favourite drinks, glass ware and cocktail making accessories. Alternatively you also turn your case into a snack bar, fill it with lots of sweet treats and open it up to friends and family when they come over for a movie night. Or why not use it as a vanity case to store all your beauty products in, you could even install a mirror and battery powered lights.

64015AC4-EBDE-42C9-98DA-6055D780F2DB.JPG


Faux Panelling

how to create decorative panelling with washi tape

If you’re looking for a super easy and none permanent solution to jazzing up your walls at home, then I’ve got just the hack for you!

A few months ago I created a tutorial for Medina Grillo’sHow I Rent’ website, offering renter friendly decor ideas and showcasing the homes of people who won’t let the fact that they’re renting, get in the way of a beautifully decorated home. 

The tutorial I created is perfect for those who are renting because a) it’s low maintenance, doesn’t involve any power tools or making a mess and 2) it’s budget friendly, the only materials you’re using are tape!

ACS_0682.JPG

I chose to use this particular style of mural in my house because as much as my style is eclectic and contemporary, I love combining traditional design elements as a nod to the past. Now, seeing as I’m currently renting, I didn’t want to start hammering wooden panelling all over the gaff, only for my landlord to ask me to remove it, so instead, I used washi tape as an equally as effective non permanent solution to my panelling desires!

STYLED CORNER 1.jpg

The best bit about using washi tapein this way, is that you can go as big or a small as you like, create different shapes and patterns, and if you change your mind 6 months down the line and fancy something different, you can just peel it off! Simples!

If you’re looking to create some effortless faux panelling in your home that’s going to cost you a fraction of what it would if you were using traditional materials, then head over to ‘How I Rent’ to check out the tutorial.


QUARANTINE CREATIONS

SCRAP fabric buckets

Lockdown was a testing time for upcycling fanatics like me who love nothing but a good rummage through charity shops on a weekend looking for the next piece of someone else unwanted junk to transform. However, when all the shops shut the only rummaging and re cycling I could do was around my own house! So I dived into my cupboard full of ‘stuff that I’ll use one day’, pulled out scraps of fabric from my sewing basket and picked out everything off my shelves and hanging off my walls that could be a potential lockdown project.

In these next few tutorials I’ll be showing you how I used lock down as an opportunity to recycle and revive house hold junk and give it life as a new home accessory.

ACS_0706.JPG
 

First up are my ‘Scrap Fabric Baskets’, which if you’re a rubbish sewer like me, and have brought plenty of fabric with the intention of creating a masterpiece but end up making a pigs ear out of it, then you’re bound to have fabric cut offs stuffed in a bag somewhere.

Now I know I initially entitled this project ‘MY’ scrap fabric baskets, but i actually stumbled across the tutorial after being inspired by accessories brand Betty & Molly on Instagram, after searching for a tutorial I could easily follow, I discovered the ‘Easy Fabric Basket’ tutorial by BluPrint.

I thought I’d share a few of my own tips on how I created my baskets, and a couple of tips on how to style your baskets once you’ve finished them!

WHAT YOU NEED

2 different size plates

Baking parchment 

Pen 

Fabric scissors

Ikea bag

Sewing machine 

Thread

Pins

Tape measure

2 types of fabric


Useful Tips

  • I used baking parchment to created my templates for the baskets, I knew I’d be wanting to make a few more, it also meant i didn’t have to measure out the fabric again!

  • I made 2 different sizes of baskets so they could be paired together when finished, you could even try using the 2 fabrics the other way round so each basket has a different colour way.

  • I picked two contrasting fabrics for the buckets, even though you’ll only be seeing a small amount of the inside colour, choosing a vibrant colour will contrast nicely with outside fabric.

  • I didn’t have any stabiliser fabric to line in between the fabrics, and as I was using what I already had in the house, I used an Ikea bag as an alternative due to their sturdiness and I knew they would hold the fabric up nicely, but you could also use a big for life shopper too.

  • I made the height of the fabric slightly taller than in the tutorial so I could have the option to store tall items in it or roll the fabric down to store smaller items.

 
ACS_0739.JPG

Styling tips

  • If like me, you have limited storage space in your bathroom, then these baskets are ideal for storing all those loose bath bombs and creams that fall out of the cupboard under the sink every time it’s opened.

  • If you’re making a large basket, try displaying them on your dressing table to store hair brushes and electrical equipment like straighteners and curling tongs. If you’ve made some of your baskets taller, they’ll come in handy for this.

  • You can also use your fabric baskets as planters, either use a waterproof fabric for the inside lining, or pop your plant inside a plastic bag before placing it in the fabric basket


image 2.jpg


Temporary Detail

5 ways to use washi tape in your home

Whether you’re a home owner or a renter, decorating your home should always be fun and hassle free, but we know thats not always the case. However, there is a product that can transform a room with little effort required and can be changed up as regularly as you like or even removed completely, instantly… I’m talkin’ Washi tape!

Washi tape has been a game changer for me, allowing me to transform my rented home by adding colour, pattern and character in a way that wont run the risk of me loosing my deposit. 

If you’re looking to put your own stamp on your home, but don’t fancy the hassle and mess that comes with painting or DIY, then check out my 5 ideas to use Washi tape at home.

ACS_0291.JPG

Super easy Confetti wallpaper

This has to the be the quickest and cheapest alternative to apply wallpaper! Make your own confetti style wallpaper but cutting up small pieces of washi tape and stick at random angles evenly spaced apart. Try using a couple of different colours on the same wall or create an ombré effect by changing the colours gradually.

ACS_0287.JPG

CREATE A FEATURE WALL

If you rent your home and your landlords not keen on your putting up wallpaper, or you own your home but simply cannot be bothered with the hassle that comes with applying wallpaper, a washi tape mural is the perfect solution. Not only does it act as a unique talking point in a room, but the design possibilities are endless. Try applying washi tape at different angles to create a geometric pattern or even create a mural  made up of small colourful  pieces of tape.

ACS_0445.JPG

Add detail with Faux panelling

If your home is a little lacklustre or lacks any original features then add detail to your walls with washi tape. Create a statement by adding faux panelling with coloured washi tape, to add character and detail to plain walls. Try square panelling for a more contemporary look or tall rectangular panelling with details in the the corner for more of a traditional antique look. 

ACCESSORIZE YOUR HOME ACCESSORIES

Washi tape is a great way to spruce up plain and lifeless surfaces, so why not apply it to your homeware too! Customise your home accessories such as plant pots and picture frames by creating graphic patterns and designs with cut up pieces of tape, this is a great alternative to painting.

IMG_6870 2.JPG

Cover Everything! 

When I say everything I mean everything and anything! Im talking doors, bookshelves, storage boxes, your kitchen cupboards, a bread bin, your lover, anything. And the best bit about washi tape, is that it peels straight off when you want to change it up, or if you’re moving house.

ACS_0267.JPG
 
 
ACS_0600.JPG
 
 
ACS_0408.JPG


Easy Upcycle

DIY Charity shop cabinet upcycle

Fancy trying your hand at transforming a second hand charity shop cabinet into a chic maximalist cocktail cabinet? Then you’re in the right place!

ACS_0153.JPG

My favourite thing about my home is people’s reaction when they see my collection of upcycled furniture, not just because it looks bloody great (even if I do say so myself) but because I’VE made it!

I went on the hunt for second hand furniture, I picked out the paints, the wallpaper, I took the time to prep and paint the furniture and now it sits looking god damn fabulous and completely original and unique in my own home... now THAT is satisfying. And what’s even more satisfying is that you’re doing your bit for the environment too, by reducing your carbon footprint buying second hand, everyone’s a winner!

ACS_0535.JPG

However a lot of people are put off at the thought of having a bash at their own up cycling project as they fear it may be too time consuming or too pricey... well I’m here to tell you it ain’t! Sure you can take your time with it if you’ve got the time and space, but there are plenty of paints and self adhesive wallpapers/vinyls that mean you can take a few short cuts to achieve your own stunning one of a kind piece of furniture.

Now this upcycle tutorial is one of my first projects, and although I didn’t use many short cuts, it didn’t take me very long, so i’ll run you through step by step how I did it, but I’ll also recommend some ways to speed up the process if you desire.

What you’ll need:

Your chosen piece of furniture

Electric sander or sanding paper or paint stripper

Damp cloth 

Furniture/chalk paint

Top coat/ Varnish

Screw driver

Wallpaper/self adhesive vinyl

Craft knife

PVA


Before…

Before…

Step 01

Remove any hardware (eg. Handles) with a screw driver and set aside. You don’t have to do this, if you think the removal will be tricky, you can masking tape around all the hardware when you start to paint to ensure it stays paint free, however a cleaner finish is achieved if you remove them then attach at the end.


Step 02

In a well ventilated area (preferably outside) begin to sand your furniture, I’d suggest an electric sander, which can be picked up for £15/20 or you can use sheets of sand paper, or alternatively, if the paint on your furniture is especially thick, you can use a paint stripper (this can be quite strong stuff so be sure to read the label before you use it!)

IMG_2349.JPG
 

Step 03

Step 3:

Once it’s sanded (that’s the hard part finished) wipe the furniture down with a damp cloth to get rid of all of the excess dust.


Step 04

Use a furniture or chalk paint to paint the furniture, I usually use Wilkos Quick Dry Satin Furniture paint as it has great coverage and finish but there are plenty of other brands available on the high street too. Paint all of your cabinet with a roller, using a brush to get into all the cracks and crevasses, and only painting the very edges of the doors as they will be covered with your chosen paper. Apply a couple of coats if needed.

IMG_2350.JPG

Step 05

Once the paint is dried, measure your wallpaper or contact paper to fit your doors. I always like to leave an inch or 2 on two of the sides and then slice the excess off with a craft knife. In this tutorial I used a wallpaper from ebay which cost around £10 for an entire roll, absolute bargain, think about all those beautiful upcycles you could do just with one roll! I used a roller to apply the PVA (but depending on how large your piece is you could use a paint brush) and carefully applied my wallpaper using a credit card to smooth out any bubbles under the surface (this is important to do as bubbles can make the surface look uneven and also lead to the paper peeling) 

But if you’re unsure about applying the wallpaper with PVA you could opt for a peel and stick (also known as vinyl or contact paper) which basically does as it says, theres a stick side that you can peel away and apply your paper. These can be purchased from sites like eBay, Amazon and Jesrose who have recently launched an exciting range of patterned vinyls to be used on your upcycles.

Step 06

Once you’ve applied your wallpaper or vinyl you’re on the home stretch to completing your own upcycled masterpiece! Lastly, but most importantly, it’s time to top coat your furniture to ensure that it’s got a profesh looking finish and also to prevent it from loosing any of its paint if it incurs any knocks or scrapes during its lifetime.

You can use any topcoat, I tend to use Ronseal Interior Varnish and use a couple of coats which I apply with a roller, then use a brush to get into the hard to reach places. I also roller over my wallpaper once it’s dry, which seals that into the furniture too (although don’t do this if you’re using vinyl as the topcoat may not adhere to the finish of the vinyl)

Step 07

Once the topcoat is dry, re attach your hardware if you removed it. You can always purchase new handles online or in hardware stores which is another great way to transform and update old furniture. 

And Voila! You’ve just created a one of a kind upcycled masterpiece ready to take centre stage of your home and make all your friend envious of your genius make over skills!


ACS_0143.JPG
ACS_0174.JPG


Altered Art

Charity Shop art upcycle

Check out these simple ways of creating your own piece of unique contemporary art with charity shop bargains!

ACS_0293.JPG

I first came across this style of art when I was about to move into my flat and I began looking on Pinterest for interiors inspo.

I love the idea of re appropriating old items into something contemporary and funky to create something entirely unique, I guess thats what upcycling is all about.

So instead of forking out the £70+ to buy a mass produced one, I decided to have a go at creating my own that would be completely one off. I regularly shop for homeware in charity shops and these sorts of reproductions of oil paintings are easy to get your hands on, usually for not more than a couple of quid too.

ACS_0181.JPG

The best thing about re appropriating this type of art is that it’s already a beautiful piece that would look at home hung anywhere, without being altered, but adding a splash of contrasting colour means it takes on a whole new lease of life as a contemporary artwork which becomes a real talking point amongst guests.

There’s no real ‘How To’ with this tutorial, you could graffiti your favourite saying or word onto it, splat paint over it Jackson Pollock style or doodle illustrations around the figures in the painting, the possibilities are really endless and you can have loads of fun with it.

But I will give you a few tips on how I’ve managed to transform 3 of these old paintings:


DIPPED paint EFFECT

5.jpg

I’ve seen this done where the painting is dipped in a large tub of paint , however, I didn’t happen to have a giant tub of paint large enough to fit my painting it, so instead I did it with spray paint. 

Heres what ya need:

Pink Spray paint 

White spray paint

Protective mask

Masking tape

Ruler

Pencil 

  • Begin by cleaning your painting, it may have gathered dust over time and any dust that’s still on the painting when you begin to paint will show up.

  • Figure out how much of your panting you wanted to appear as if it has been dipped in paint and measure from the bottom up to the point you want the rest of painting to be exposed.

  • Mark out lightly up to where you have measured and with your masking tape, mask the part of the painting you don’t want painted, pencilling the line means you’ll get a perfectly straight line of paint rather than it being slightly off.

  • Once you’ve masked part of the painting, take your painting to a well ventilated area and wearing a protective mask spray the area in white spray paint, I like to use a base coat to make bright colours especially neons really stand out. 

  • Allow the white spray paint to dry and apply another layer if needed. Once dried, spray the pink paint, I usually use the Kobra neon pink paint, leave to dry and apply another coat if needed. Once it’s dried peel off the making tape and hang!

brushed paint effect

Get a paint brush that will create the correct size brush stroke to fit your painting, if you have a large painting then I suggest buying a large paint brush so you can achieve the effect in one stroke, rather than lots of small ones, and likewise if your art is smaller, use a smaller paint brush.

Before applying my chosen colour, I do the same effect but with a white paint, this acts as a base coat and makes your chosen colour pop even more.

ACS_0370.JPG

GRAFFITI SPRAY EFFECT

If you’ve got a phrase or word in mind to spray into the painting, it’s best to plan out where each letter will go, the last thing you want to do is start painting and realise you can fit the last couple of letter on! So I suggest writing in pencil lightly on the painting where you want the word to go, then once you’ve sprayed and it has dried, you won’t be able to see the pencil lines.

6.jpg


LampShade Makeover

Charity Shop Challenge

Check out my video of how to turn charity shop lampshade from drab to fab!

IMG_6961.jpg
 

What ya need

A cylindrical lamp shade

Wallpaper

Craft knife 

Cutting mat

Ruler

Pencil

Strong double sided tape  

Glue gun

Spray paint

Protective mask 

Masking tape

Fringing (optional)

Step 01

Before you start make sure your lampshade is clean and dust free, otherwise the dust will show up where you spray paint and the tape or glue won’t adhere properly to the shade.

Decide on a spray paint and wallpaper you’re going to decorate your lampshade with and measure how big the piece of wallpaper will have to be to cover the shade, I like to add on an extra 2cm to the length to ensure there won’t be a gap.


Step 02

Before spraying your lampshade, use masking tape to cover any bits you don’t want being painted like the flex or the fittings inside.

Take your lampshade to a well ventilated area to spray paint, wearing a protective mask, spray the inside of the shade and the edges, leave to dry. Spray an extra coat if patchy.


Step 03

While you’re waiting for the shade to dry, using a cutting mat and craft knife, cut a piece of wallpaper to fit your shade.

Apply double sided tape or use a glue gun on the original seam of the lampshade and begin to wrap your shade in the wallpaper making sure the edges of the paper meet with the edges of the lampshade. 

If you have cut the paper slightly bigger, then the excess can get sliced off with a craft knife once the paper is stuck on.

If you’re happy with how your lampshade is looking and don’t think it needs any extra embellishment then your work here is done! 


Step 04

However, if you’d like to add some final touches, cut a length of bobble fringing or tassels to fit the circumference of your shade and using a glue gun, carefully apply the fringing to the edge of the shade. Leave to dry and remove any excess bits of glue. 

And Voila! There you have your cheap as chips, unique AF upcycled lampshade!


COMING SOON 

Home Hacks & diy tutorials


ACS_0430.jpg